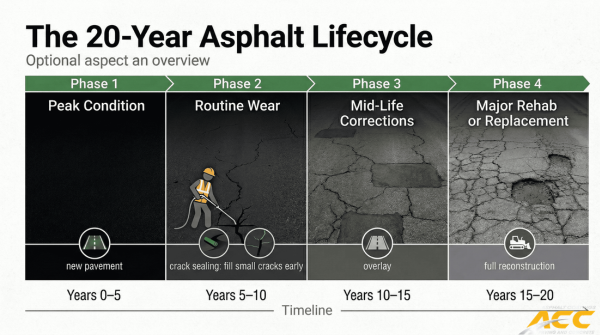
Parking lot pavements are not prone to damage, cracks, and other signs of wear over the years. Regular sealcoating extends the lifespan of your parking lot as it acts as an additional protective layer over The Step‑by‑Step Process of Parking Lot Sealcoating.
If you’re planning to sealcoat your asphalt parking lot, this blog is exactly what you need. Parking lot sealcoating is a labour-intensive, step-by-step process that requires careful and precise execution.
In this blog, we’ll go over an 8-step procedure starting from initial inspection to the final re-striping to help make your parking lot look as good as new.
Tools You’ll Need to Sealcoat A Parking Lot
To complete a professional sealcoating job, gather the right equipment before you begin. Essential tools include:
- Surface‑prep tools: Mechanical broom or rotary scrubber, pressure washer (2,000–3,000 psi), degreaser, push broom
- Repair tools: Wire brush or compressed air wand, backer rod, hot‑ or cold‑pour crack filler, asphalt patch mix, hand tamper or plate compactor
- Application tools: Squeegee or spray system, mixing paddle and bucket, measuring tools (tape measure, chalk line)
- Safety gear: Gloves, safety glasses, high‑visibility vest, traffic cones or barricades
With the right tools in hand, we’ll move on to the sealcoating process below.
An 8-Step Parking Lot Sealcoating Process
Below is a detailed, step-by-step process to sealcoat your parking lot pavement professionally.
Step 1: Initial Inspection and Evaluation
The very first step starts off with inspecting and evaluating the entire parking lot to lay the groundwork for a high-quality sealcoating job.
Begin by walking the entire parking area and noting pavement defects. Record crack types (hairline, linear, alligator), measure their length, and mark their locations on a simple sketch. Identify potholes, their size and depth, as well as oil stains and areas where water ponds. You should photograph each problem spot for reference.
Also, assess traffic patterns to determine high‑wear zones. Make use of these observations to estimate material quantities (sealcoat, crack filler, patch mix) and plan labor.
Step 2: Clean the Surface Thoroughly
A clean surface is mandatory for proper sealcoat adhesion. Before you begin any asphalt repairs or sealing, make sure the entire parking lot is free from debris, dirt, and oil stains.
Here’s how you can clean the surface professionally:
- Sweep the area using a mechanical broom or heavy-duty push broom to remove loose dirt and gravel.
- Use a pressure washer (2,000–3,000 psi) to clean deeper layers of dust and stuck-on debris.
- Apply a degreaser to oil spots and scrub them with a stiff wire brush.
- Remove vegetation growing in cracks or along edges with a weed trimmer or hand tools.
- Allow the surface to dry completely before moving to the next step. Moisture trapped under the sealcoat can cause it to peel or wear out faster.
Step 3: Properly Seal All Cracks
Cracks are one of the main causes of long-term pavement damage, as they allow water to reach the base layer. Sealing them early prevents potholes and structural failure, which is why crack sealing prevention is so important.
Here’s how to properly seal cracks:
- Inspect the cracks again to make sure they’re clean and dry.
- Clear out debris using a wire brush or crack cleaning machine.
- Blow out remaining dust with a high-powered air blower or compressor.
Now, apply the crack filler:
- For cracks less than ½ inch wide, use a cold-pour rubberized crack filler.
- For wider cracks, insert a backer rod first, then use a hot-pour crack sealant.
Make sure the filler is level with the pavement. Allow it to cure completely based on the product instructions. This step seals out moisture and strengthens the surface before the sealcoat goes on.
Certainly! Here’s the reader-friendly content for Steps 4 and 5, written in a formal yet conversational tone with appropriate use of bullet points:
Step 4: Pothole Repair and Patching
Before you apply any sealcoat, it’s important to repair all potholes and damaged areas. Proper pothole repair steps can extend the life of your pavement and prevent recurring damage.
You should:
- Clean the pothole by removing loose debris, dirt, and broken asphalt using a shovel or broom.
- Cut the edges of the pothole into clean, straight lines with a saw or chisel to allow the patch to bond securely.
- Apply tack coat to the bottom and sides of the hole to help the patching material stick.
- Fill the hole with cold or hot asphalt patch mix, depending on your equipment and weather conditions.
- Compact the patch using a hand tamper or plate compactor until it’s level with the surrounding surface, following best practices from patching vs full-depth repair methods.
Let the patched area settle and dry fully before moving to the next step.
Step 5: Prep the Surface for Sealcoating
Once all cracks and potholes are repaired, prepare the entire surface for sealcoating.
Here’s what you should do:
- Inspect the surface again to confirm all repairs are complete and cured.
- Clear off any new debris that may have settled after repairs, especially dust and loose materials.
- Mark off edges, curb and gutter, and structures with masking tape or shields to avoid unwanted coating in those areas.
- Block access to the area using cones, barricades, or tape to keep vehicles and pedestrians off the surface.
At this stage, the surface should be fully clean, dry, and ready for the sealcoat.
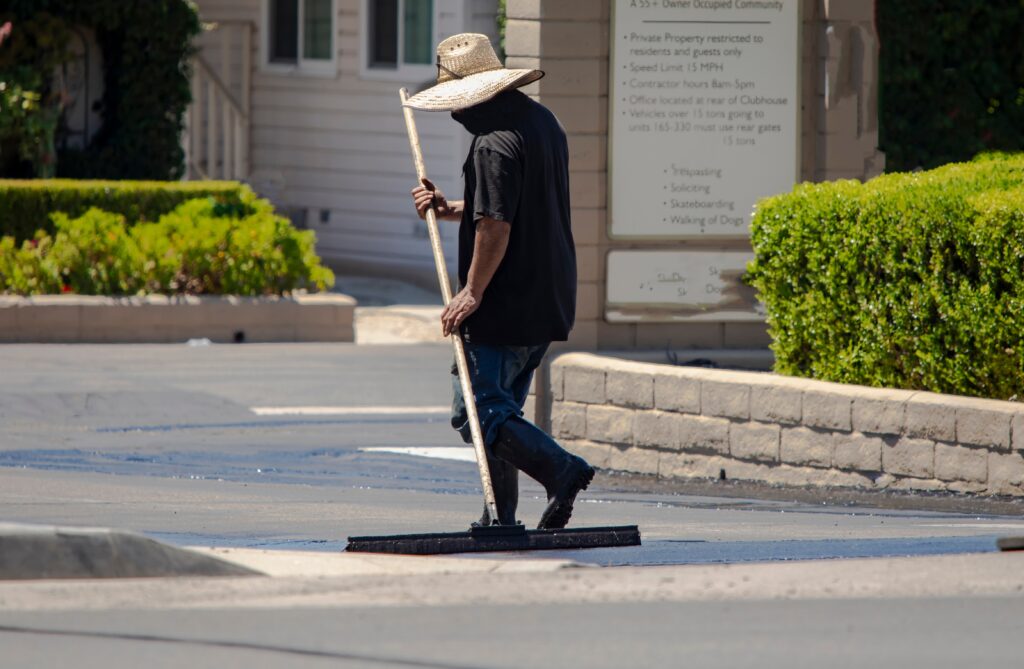
Step 6: Mix and Apply the Sealcoat
Before you begin, stir the sealcoat thoroughly to redistribute solids that settle at the bottom. If you’re using a concentrated formula, dilute it according to the manufacturer’s instructions. Always work in manageable sections (200–500 sq ft) to maintain control.
- Application method: Choose a squeegee for precision or a spray system for speed.
- First pass: Spread a 20 mil wet film of sealcoat, keeping a consistent ribbon of material.
- Second pass: After 2–4 hours, when the first coat is dry to the touch, apply a perpendicular coat for even coverage.
Step 7: Drying and Curing
After applying the sealcoat, allow enough time for it to dry and cure properly. Drying time can vary based on temperature, humidity, and sunlight.
- Keep the area blocked off to prevent traffic or foot movement during this stage.
- Allow at least 24 to 48 hours for full curing, depending on product guidelines and weather conditions.
You should avoid opening the lot too early, as this can lead to scuffing or premature wear.
Step 8: Re‑stripe the Parking Lot
Once the sealcoat has fully cured, you can re‑stripe the parking lot to restore clear, professional markings. First, snap chalk lines as guides for accuracy. Then, use a line‑striping machine or hand roller to apply traffic‑grade paint in two thin coats.
Allow each coat to dry 2–4 hours before the next. Finally, remove guides and reopen the lot.
Which Weather Is Best for Sealcoating Your Parking Lot?
The optimal weather conditions for sealcoating your parking lot involve warm, dry, and calm days. Ideal temperatures range from 55°F to 90°F, with the best results often achieved around 70°F. Humidity levels should be below 60% to facilitate proper drying and curing.
Make sure that no rain is forecasted for at least 24–48 hours post-application, as moisture can impair the sealcoat’s effectiveness. Additionally, light breezes can aid the drying process, but avoid high winds that may disrupt the application or cause uneven curing.
Tips On How to Preserve Your Sealcoat
Here are six easy post-sealcoating maintenance tips to help preserve the integrity and appearance of your parking lot:
- Avoid Heavy Traffic: Keep vehicles off the freshly sealed surface for at least 24 hours to allow proper curing.
- Clean Spills Promptly: Address oil, gasoline, or chemical spills immediately to prevent surface damage.
- Regular Sweeping: Remove debris such as leaves and trash to prevent staining and surface wear.
- Inspect for Cracks: Regularly check for new cracks and seal them promptly to prevent water infiltration.
- Maintain Proper Drainage: Ensure that water drains away from the surface to avoid pooling and potential damage.
- Reapply Sealcoat Periodically: Consider reapplying sealcoat every 2–3 years to maintain protection and appearance.
Frequently Asked Questions
How long after sealing a parking lot can you drive on it?
You should wait 24 to 48 hours before driving on a newly sealcoated parking lot. The exact time depends on the weather. Hot, sunny days help it dry faster, while cooler or humid conditions may need more time.
How much does sealcoating a parking lot cost?
Sealcoating a parking lot typically costs $0.15 to $0.30 per square foot. So for a 10,000 sq. ft. lot, the cost could range from $1,500 to $3,000, depending on location, surface condition, and the contractor you choose. Reach out to Asphalt Coatings Company to get a free estimate for affordable commercial parking lot sealcoating.
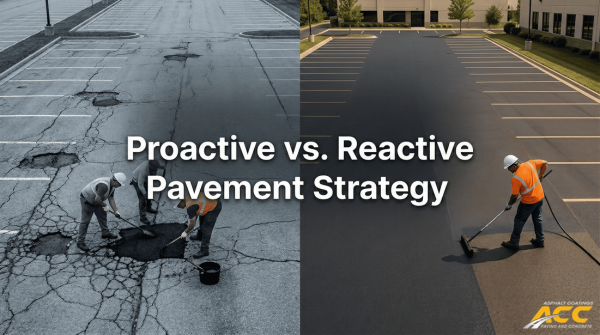
Give Your Parking Lot the Protection It Deserves
Properly maintaining your parking lot is critical for its appearance, safety, and longevity. In this blog, we’ve outlined the step-by-step process of parking lot sealcoating, from inspection to re-striping.
While these steps are essential for effective sealcoating, achieving the best results can be challenging without the right tools and expertise. If your parking lot needs professional care or you’re struggling with upkeep, don’t hesitate to consider professionals like us!
Asphalt Coatings Company specializes in commercial parking lot sealcoating and offers high-quality services that keep your lot in top shape. With over 30 years of experience in the business, you cannot go wrong with our services.
Don’t let maintenance issues slow you down. Contact us today for a free consultation and let us handle the hard work!